

5 React ajax
5.1 介绍
React本身只关注于界面, 并不包含发送ajax请求的代码
前端应用需要通过ajax请求与后台进行交互(json数据)
react应用中需要集成第三方ajax库(或自己封装)
常用的ajax请求库
jQuery: 比较重, 如果需要另外引入不建议使用
axios: 轻量级, 建议使用
封装XmlHttpRequest对象的ajax
promise风格
可以用在浏览器端和node服务器端
5.2 使用axios
安装axios
yarn add axios使用
import './App.css';
import axios from 'axios'
import React, { Component } from 'react'
export default class App extends Component {
getStudentData = () => {
axios.get("http://localhost:5000/students").then(
response => {console.log('Success', response.data)},
error => {console.log('Error', error)}
)
}
render() {
return (
<div>
<button onClick={this.getStudentData}>点我获取学生数据</button>
</div>
)
}
}测试

显示跨域,怎么解决这个问题呢?配置代理
跨域实际上请求是可以发的,只是数据回不来而已
5.3 React脚手架配置代理
5.3.1 修改package.json
"proxy": "http://localhost:5000"注意,这种方法在react 18之后并不适用,工作台一般会运行不了 报这个错误
yarn run v1.22.19
$ react-scripts start
Invalid options object. Dev Server has been initialized using an options object that does not match the API schema.
 - options.allowedHosts[0] should be a non-empty string.
error Command failed with exit code 1.
info Visit https://yarnpkg.com/en/docs/cli/run for documentation about this command.
5.3.2 编辑setupProxy.js
const { createProxyMiddleware } = require('http-proxy-middleware')
module.exports = function (app) {
app.use(
createProxyMiddleware('/api1', {
target: 'http://localhost:5000',
changeOrigin: true,
pathRewrite: { '^/api1': '' }
}),
createProxyMiddleware('/api2', {
target: 'http://localhost:5001',
changeOrigin: true,
pathRewrite: { '^/api2': '' }
})
)
}5.4 消息订阅-发布机制
下载:
npm install pubsub-js --save使用:
消息发布:
PubSub.publish('update_data', {isLoading: false, users: response.data.items})消息订阅:
componentDidMount() {
this.token = PubSub.subscribe('update_data', (_, stateObj) => {
console.log("receive data: ", stateObj)
this.setState(stateObj)
})
}
componentWillUnmount() {
PubSub.unsubscribe(this.token)
}6 React路由
6.1 基础概念
6.1.1 SPA
单页Web应用(single page web application,SPA)。
整个应用只有一个完整的页面。
点击页面中的链接不会刷新页面,只会做页面的局部更新。
数据都需要通过ajax请求获取, 并在前端异步展现。
6.1.2 路由
什么是路由?
一个路由就是一个映射关系(key:value)
key为路径, value可能是function或component
路由分类
后端路由:
理解: value是function, 用来处理客户端提交的请求。
注册路由: router.get(path, function(req, res))
工作过程:当node接收到一个请求时, 根据请求路径找到匹配的路由, 调用路由中的函数来处理请求, 返回响应数据
前端路由:
浏览器端路由,value是component,用于展示页面内容。
注册路由: <Route path="/test" component={Test}>
工作过程:当浏览器的path变为/test时, 当前路由组件就会变为Test组件
6.2 react-router-dom
react-router-dom是react的一个插件库,专门用来实现一个SPA应用。基于react的项目基本都会用到此库。
安装
yarn add react-router-dom引入
import { Link, BrowserRouter, Route } from 'react-router-dom'使用
<div>
<BrowserRouter>
<div className="row">
<div className="col-xs-offset-2 col-xs-8">
<div className="page-header"><h2>React Router Demo</h2></div>
</div>
</div>
<div className="row">
<div className="col-xs-2 col-xs-offset-2">
<div className="list-group">
{/* <a className="list-group-item" href="./about.html">About</a>
<a className="list-group-item active" href="./home.html">Home</a> */}
<Link className="list-group-item" to="/about">About</Link>
<Link className="list-group-item" to="/home">Home</Link>
</div>
</div>
<div className="col-xs-6">
<div className="panel">
<div className="panel-body">
<Route path="/about" component={About} />
<Route path="/home" component={Home} />
</div>
</div>
</div>
</div>
</BrowserRouter>
</div>6.2.1 Route
Route组件:可以指定路径和组件,在路径不同时展示组件使用,在Route外侧需要有Router包裹,可选用的Router有
HashRouterBrowserRouter
6.2.2 Link
Link组件:React中靠路由链接实现切换组件,Link可以切换当前的路径,在Link外侧也需要有Router包裹
实际上最后渲染的Html为
<a className="list-group-item active" href="/about" aria-current="page">About</a>6.2.3 NavLink
NavLink组件:为Link组件的升级版,可以为选中的Link添加指定的样式,方式为
<NavLink activeClass="active" className="list-group-item" to="/about">About</NavLink>若不指定activeClass,则默认为active
6.2.4 Switch
Switch组件:当我们使用Route组件时,包含相同的path,会依次匹配,展示所有相同path的组件,我们可以使用Switch组件,指定当匹配到第一个组件的时候,就不继续匹配。使用方法
<Switch>
    <Route path="/about" component={About} />
    <Route path="/home" component={Home} />
    <Route path="/home" component={Test} />
</Switch>
6.2.5 Redirct
Redirct组件:一般写在所有路由注册的最下方,当所有路由都无法匹配时,跳转到Redirct指定的路由
<Switch>
    <Route path="/about" component={About} />
    <Route path="/home" component={Home} />
    <Redirect to="/home" />
</Switch>
6.2.6 HashRouter和BrowserRouter
底层原理不一样
BrowserRouter使用的是H5的history Api,不兼容IE9及以下版本HashRouter使用的是URL的Hash值
URL表现形式不一样
BrowserRouter的路径中没有#,例如localhost:3000/a/bHashRouter的路径中带#,例如localhost:3000/#/a/b
刷新后对路由state参数的影响
BrowserRouter没有影响,因为state保存在history对象中HashRouter刷新后会导致路由state参数的丢失
6.3 路由组件和一般组件的区别
写法不同
一般组件:
</Demo>路由组件:
<Route path="/demo" component={Demo}>
存放位置不同
一般组件:
components路由组件:
pages
接收到的props不同
一般组件:根据传入时的标签
路由组件:接收到三个固定属性
history:
    go: function go(n)
    goBack: function goBack()
    goForward: function goForward()
    push: function push(path, state)
    replace: function replace(path, state)
location:
    pathname: "/home"
    search: ""
    state: undefined
match:
    params: Object {  }
    path: "/home"
    url: "/home"
一般组件可以通过
withRouter加工为路由组件,withRouter的返回值是一个新组件,使用方法为:
import React, { Component } from 'react'
import { withRouter } from 'react-router-dom'
class Header extends Component {
render() {
return (
<div>
</div>
)
}
}
export default withRouter(Header)6.4 向路由组件传递参数
6.4.1 Params参数
传递:
{/* 路由连接携带参数 */}
<Link to={`/home/message/detail/${msgObj.id}/${msgObj.title}`}>{msgObj.title}</Link>
{/* 注册路由声明接收 */}
<Route path="/home/message/detail/:id/:title" component={Detail}/>
接收:
let {id, title} = this.props.match.params6.4.2 Search参数
传递
<Link to={`/home/message/detail/?id=${msgObj.id}&title=${msgObj.title}`}>{msgObj.title}</Link>
<Route path="/home/message/detail" component={Detail}/>
接收
let {search} = this.props.location
let parse = qs.parse(search.slice(1))
let {id, title} = parse
需引入qs库
import qs from 'qs'
6.4.3 State参数
传递
<Link to={{pathname:'/home/message/detail', state: {...msgObj}}}>{msgObj.title}</Link>
<Route path="/home/message/detail" component={Detail}/>
接收
let {id, title} = this.props.location.state || {}6.5 编程式路由导航
<Link to={`/home/message/detail/?id=${msgObj.id}&title=${msgObj.title}`}>{msgObj.title}</Link>
<button onClick={() => {this.pushShow(msgObj.id, msgObj.title)}}>push查看</button>
<button onClick={() => {this.replaceShow(msgObj.id, msgObj.title)}}>replace查看</button>
replaceShow = (id, title) => {
this.props.history.replace(`/home/message/detail/${id}/${title}`)
}
pushShow = (id, title) => {
this.props.history.push(`/home/message/detail/${id}/${title}`)
}7 Redux
7.1 Redux介绍
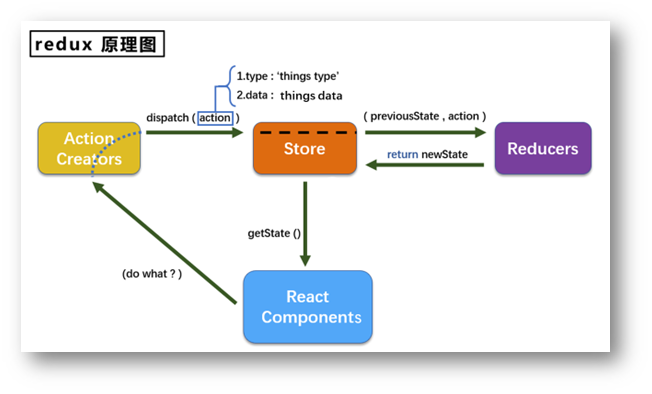
概念
redux是一个专门用于做状态管理的JS库(不是react插件库)。
它可以用在react, angular, vue等项目中, 但基本与react配合使用。
作用: 集中式管理react应用中多个组件共享的状态。
什么情况下需要使用redux
某个组件的状态,需要让其他组件可以随时拿到(共享)。
一个组件需要改变另一个组件的状态(通信)。
总体原则:能不用就不用, 如果不用比较吃力才考虑使用。
7.2 redux的三个核心概念
7.2.1 action
action为动作的对象,包含2个属性
type:标识属性, 值为字符串, 唯一, 必要属性
data:数据属性, 值类型任意, 可选属性
7.2.2 reducer
reducer用于初始化状态、加工状态。加工时,根据旧的state和action, 产生新的state的纯函数。
7.2.3 store
将state、action、reducer联系在一起的对象
7.3 快速入门
创建store
import {legacy_createStore as createStore} from 'redux'
import countReducer from './count_reducer'
export default createStore(countReducer)
createStore API标记为@deprecated(废弃),并且添加了一个全新的legacy_createStore API,但是并没有添加弃用警告。此外该版本鼓励用户迁移到Redux Toolkit。import { configureStore } from "@reduxjs/toolkit";
创建reducer
import {INCREMENT, DECREMENT} from './constant'
let initState = 0
export default function countReducer(preState = initState, action) {
console.log(preState, action)
let {type, data} = action
switch (type) {
case INCREMENT :
return preState + data * 1
case DECREMENT:
return preState - data * 1
default:
return preState
}
}创建action
import {INCREMENT, DECREMENT} from './constant'
export let createIncrementAction = data => ({
type: INCREMENT,
data
})
export let createDecrementAction = data => ({
type: DECREMENT,
data
})使用
import React, { Component } from 'react'
import store from '../../redux/store'
import {createDecrementAction, createIncrementAction} from '../../redux/count_action'
export default class Count extends Component {
increment = () => {
let {value} = this.selectNum
store.dispatch(createIncrementAction(value * 1))
}
decrement = () => {
let {value} = this.selectNum
store.dispatch(createDecrementAction(value * 1))
}
incrementIfOdd = () => {
let {value} = this.selectNum
let count = store.getState()
if (count % 2 !== 0) store.dispatch(createIncrementAction(value * 1))
}
incrementAsync = () => {
let {value} = this.selectNum
setTimeout(() => {
store.dispatch(createIncrementAction(value * 1))
}, 500)
}
render() {
return (
<div>
<h1>Count sum: {store.getState()}</h1>
<select ref={c => this.selectNum = c}>
<option value="1">1</option>
<option value="2">2</option>
<option value="3">3</option>
</select>
<button onClick={this.increment}>+</button>
<button onClick={this.decrement}>-</button>
<button onClick={this.incrementIfOdd}>increment if odd</button>
<button onClick={this.incrementAsync}>increment async</button>
</div>
)
}
}注意,上面只是更新值,但不会更新页面,可以在index.js
store.subscribe(() =>{
  root.render(
    <React.StrictMode>
      <App />
    </React.StrictMode>
  );
})
7.4 异步Action
安装redux-thunk
yarn add redux-thunk修改store
import {legacy_createStore as createStore, applyMiddleware} from 'redux'
import countReducer from './count_reducer'
import thunk from 'redux-thunk'
export default createStore(countReducer, applyMiddleware(thunk))使用:
export let createIncrementAsyncAction = (data, time) => {
    return (dispatch) => {
        setTimeout(() => {
            dispatch(createIncrementAction(data))
        }, time)
    }
}
7.5 react-redux
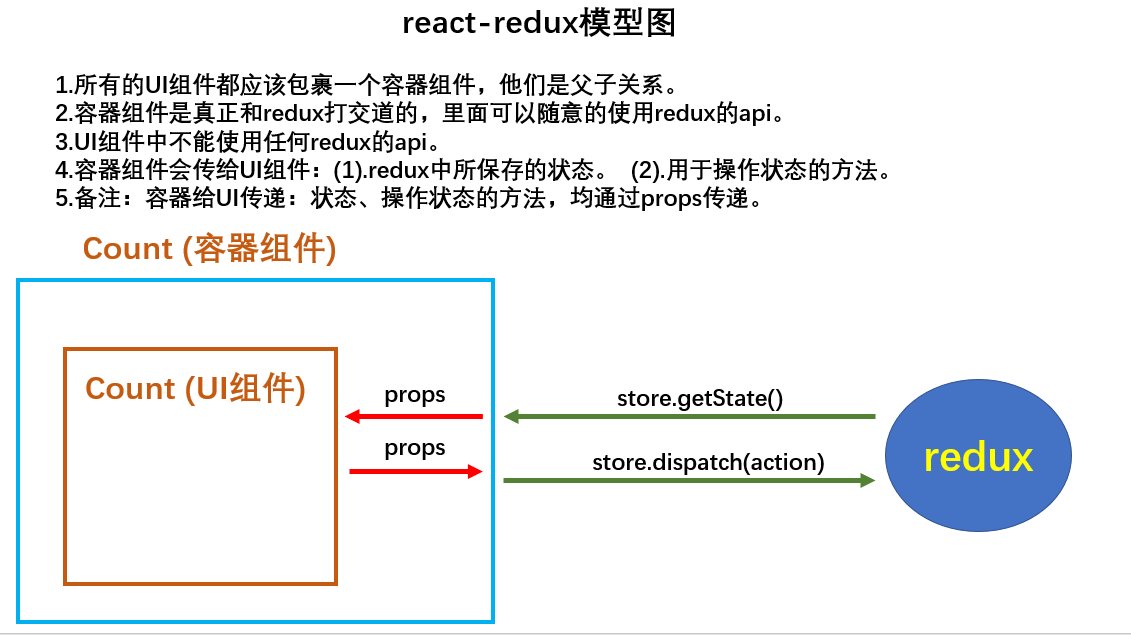
添加UI组件
import {connect} from 'react-redux'
import CountUI from '../../components/Count'
import {createIncrementAction, createDecrementAction, createIncrementAsyncAction} from '../../redux/count_action'
// mapStateToProps用于传递状态,返回是一个对象
// key作为传递给UI组件props的key,value作为传递给UI组件props的value
function mapStateToProps(state) {
return {
count: state
}
}
// mapStateToProps用于传递操作状态的方法,返回是一个对象
// key作为传递给UI组件props的key,value作为传递给UI组件props的value
function mapDispatchToProps(dispatch) {
return {
increment: (number) => {
dispatch(createIncrementAction(number))
},
decrement: (number) => {
dispatch(createDecrementAction(number))
},
incrementAsync: (number, time) => {
dispatch(createIncrementAsyncAction(number, time))
}
}
}
export default connect(mapStateToProps, mapDispatchToProps)(CountUI)修改App.js
import './App.css';
import React, { Component } from 'react'
import Count from './containers/Count';
import store from './redux/store';
export default class App extends Component {
render() {
return (
<div>
<Count store={store}/>
</div>
)
}
}使用:
import React, { Component } from 'react'
export default class Count extends Component {
increment = () => {
let {value} = this.selectNum
this.props.increment(value * 1)
}
decrement = () => {
let {value} = this.selectNum
this.props.decrement(value * 1)
}
incrementIfOdd = () => {
let {value} = this.selectNum
let count = this.props.count
if (count % 2 !== 0) {
this.props.increment(value)
}
}
incrementAsync = () => {
let {value} = this.selectNum
this.props.incrementAsync(value, 500)
}
render() {
return (
<div>
<h1>Count sum: {this.props.count}</h1>
<select ref={c => this.selectNum = c}>
<option value="1">1</option>
<option value="2">2</option>
<option value="3">3</option>
</select>
<button onClick={this.increment}>+</button>
<button onClick={this.decrement}>-</button>
<button onClick={this.incrementIfOdd}>increment if odd</button>
<button onClick={this.incrementAsync}>increment async</button>
</div>
)
}
}
评论